Resources
Everything about your kiosk.
Everything the kiosk does, top to bottom. First time? Quick setup. Race night? Event day.
1.1
Requirements
Four things. Check them before it ships.
- Past 6 ft: 12-gauge outdoor extension cord. No power strips off the concession stand.
- No captive-portal ("click to agree") networks. A phone hotspot works.
- Sun overheats the tablet. Rain registers as touches.
1.2
Size & footprint
2.1
Unboxing & placement
Ships lying down on a pallet. Cut the straps, lift the sleeve, two people walk it upright. Hand truck to move it. No casters.
- Pick the spot first. Under cover, screen away from the sun, near an outlet with Wi-Fi.
- Turn the leveling feet until it doesn't rock.
- Keep the pallet and sleeve for the off-season.
Room to work behind it
The printers are behind the door on the back, and you will be in there every event to load bands. Leave three feet of clear floor behind the kiosk — enough to swing the door wide and kneel in front of it. Don't back it against a fence, a wall, or a trailer. If the spot is dark, put a light on it. Nobody loads a roll by feel.
Put a trash can next to it. Every fan peels the backing tab off the band and drops it. Without a can at the kiosk they end up on the ground. One can within arm's reach of the screen.
Door keys. Two keys, taped inside the door. No spares from us: lose both and the door gets drilled. Get a copy cut the week it arrives. One with the gate lead, one in the office.
2.2
Antenna
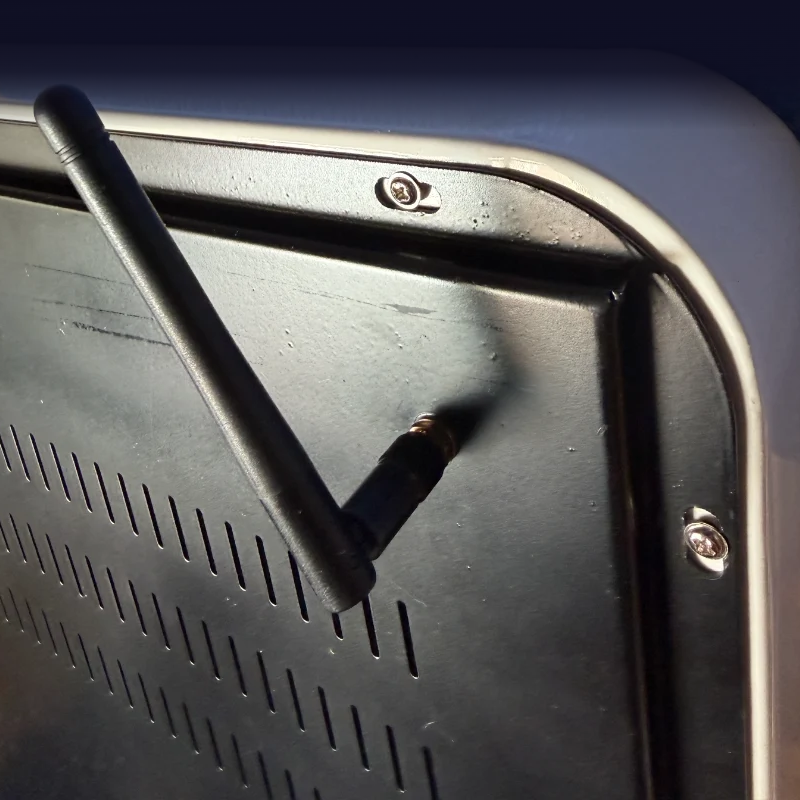
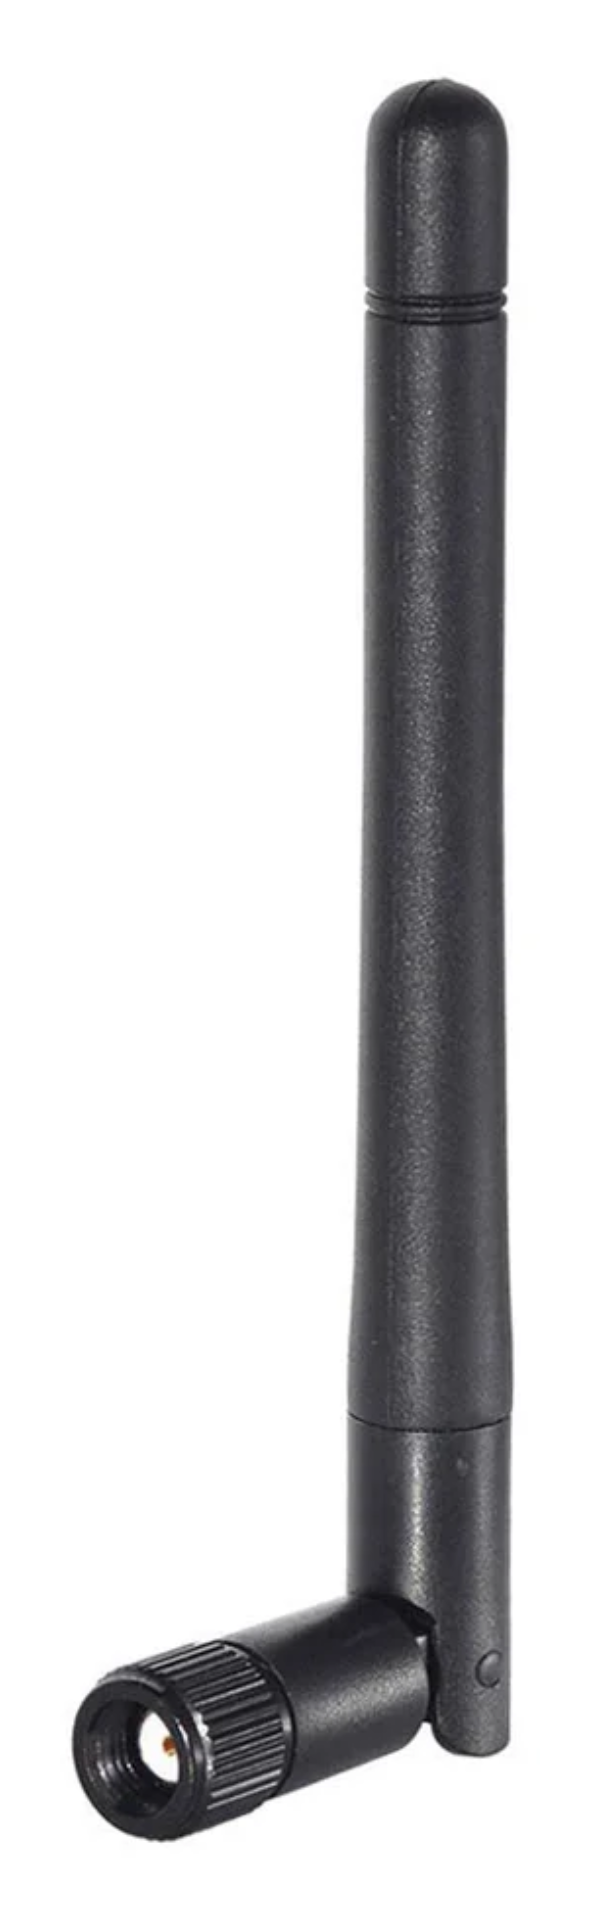
The antenna itself. Ships loose in the crate. Tap to enlarge.
Spare: any dual-band Wi-Fi antenna with an RP-SMA screw connector — that's the standard router kind. Buy on Amazon.
Ships loose. Screw it onto the post on the back, upper right, pointing straight up. Hand-tight. The post can't be replaced at the track. Take it off before moving the kiosk.
Where the router goes
- Within 30 ft, nothing metal in between.
- Up high, at head height or on the awning frame. Not behind a table.
- Away from the electrical panel or generator.
- Check with the door closed, kiosk in place: tap the signal badge.
2.3
Power
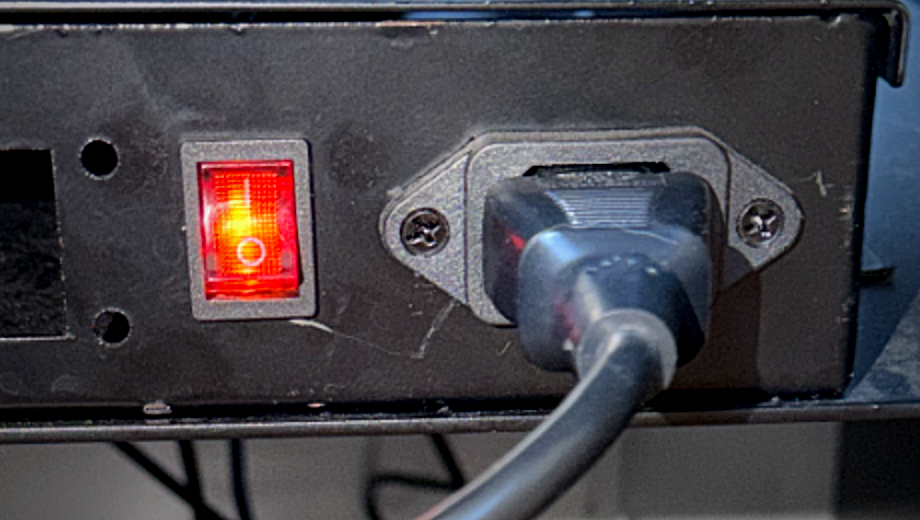
One standard outlet. Plug in to start, unplug to stop. Boot takes about a minute.
- Power board is inside the door, bottom left. Plug the cord into its socket.
- Feed the cord out the notch at the bottom-left so the door closes flat.
- Flip the lighted rocker switch on. Leave it on for good.
- Draws about 3A. Don't share a circuit with a fryer or heater.
- No light on the board: check the wall, then the breaker.
- To shut down: wait for printers to finish, swipe up from the bottom edge, tap the power icon, Power off. Unplug when the scanner light goes out.
Surge protector. Track power is dirty. Put a 1,000+ joule surge strip on the cabinet floor, plug the kiosk into it, run the strip's cord out the notch. Replace it when its "protected" light goes out.
3.1
Wi-Fi
Every pass has to be checked against your event online, so the kiosk needs internet the whole time the gate is open. It doesn't use much — far less than someone watching video on their phone — but a weak signal means a slow line.
What works, best first

Dish with clear sky, router in a weatherproof box within 30 ft of the kiosk. Mini handles one or two kiosks.
A small Wi-Fi box at the gate, fed by a cable or a link from the tower, on its own network name.
A phone or a little cell modem sharing its data. Keep it at the gate, plugged in, and make sure the hotspot doesn't shut itself off.
Shared with every fan streaming video, and usually behind a sign-in page. Last resort.
Getting it on the network
Brand new kiosk, nothing installed yet: after it boots you land on the Android home screen. Six dots at the bottom → Settings → Network and Internet → Wi-Fi → your network → password → Connect.
Once the Kiosk software is on you never go back into Android for this. Connect to Wi-Fi sits on the platform picker, and under the gear once you're logged in.
- It lists what it can see. Strongest network at the top, each with signal bars and a padlock if it needs a password. Yours should be at or near the top with the bars filled — halfway down with one bar means the router is too far away.
- The label under each name tells you where you stand. Saved — the kiosk knows it and rejoins by itself every boot. Secured — needs the password. Open network — no password, usually the guest network you don't want.
- Tap yours and type the password. Big on-screen keyboard, no laptop needed.
- Connect. A few seconds of Connecting…, then Connected. It's saved from then on.
Skip in the corner leaves it for later. Fine while you're moving the cabinet around, but nothing scans until it's online.
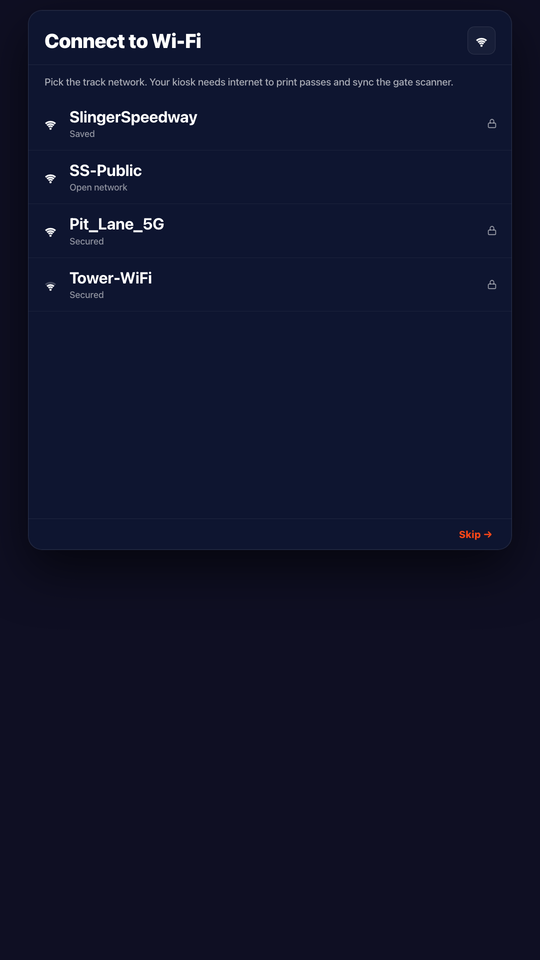
Connect to Wi-Fi
Rules
Reading the signal
Every screen shows bars and a word in the bottom corner.
Tap the badge and the kiosk opens its connection panel — the six numbers it watches all night, each on a colored track. You don't need to know what the numbers mean; the track tells you.
Bottom of the panel is the verdict in one line: either passes will validate in well under a second, or it tells you it's too weak to scan reliably. That line is the only part you have to read.
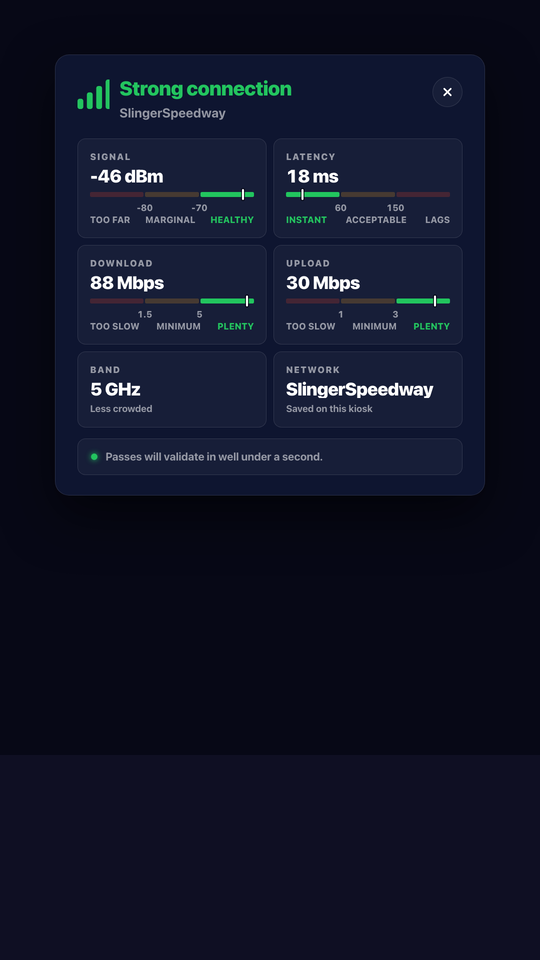
Connection details
If it drops mid-event
The kiosk puts up an out of service screen, keeps trying every few seconds, and texts your alert contact after two minutes. Check the antenna, check the lights on the router, restart the kiosk. Still down: hold the gear → Connect to Wi-Fi and point it at a phone hotspot. Sort the router out tomorrow.
3.2
Software & updates

Download it on the kiosk from kiosk.pitpay.com/download.
- Browser → kiosk.pitpay.com/download → Download Kiosk Software.
- Android warns. Tap Download anyway.
- Tap Open on the notification, or Explorer → Download → the file.
- Allow from this source → Install → Open.
On boot
Plug in and the tablet starts in about a minute. Once Kiosk is installed it opens by itself about 30 seconds later, full screen. Nobody touches Android again.
Updates
An Update available banner shows on the welcome screen. Tap it before gates open, never during. Re-downloading reinstalls over the top and keeps settings.
3.3
Getting around Android
You only see it before the software is installed, or after the home button inside the door.
4.1
First-time setup
Name → Wi-Fi → test print → Choose Your Platform.
Three questions the first time it opens.
- Name it. Where it lives: Main Gate, Pit Gate. This is its name in your dashboard, on reports, and in every text alert. Don't reuse a name.
- Wi-Fi. Shows the network and signal you connected in Android. It should read Strong. Weak? Fix the router before going on.
- Printers. It prints one blank band. Tap the side it came out of; that's Printer A, the primary. B is the backup and the second-color roll.
Both can be changed later from operator settings.
4.2
Logging in
Number, then the six-digit code.
Pick Pit Pay or Ticket Hoss, enter your mobile number, enter the six-digit code. No passwords.
- US and Canada. Tap the flag to switch.
- No code? Resend, or Email Code.
- Stays logged in until you log out. Anyone on your track account can log in.
4.3
Events & colors
Pick the event, then a color for Printer A.
After login: your next five events, today's first in an orange frame. Tap one, pick the color on the spindles (or Skip and set it from the gear).
- Each day of a multi-day weekend is its own event. Wrong day picked = Wrong Day for every fan.
- Events sync from your dashboard.
- Change any time: gear → Change Event.
Ticket types
After the colors, tap Choose a band color for each ticket type. Every pass type gets an A, a B, or nothing.
- A or B is the printer, so it's the color. Adults on A (red), kids on B (white): pit gate tells them apart at a glance.
- Blank means it won't print. Grandstand GA has no pit access, so it gets nothing; the fan sees Wrong ticket type and goes to the grandstand gate.
- Multi-day weekend: each day has its own tab. Set Friday, then Use these colors on every day.
- Change it any time: gear → Change Event.
Gate-open time
Set Gates open on the event in your dashboard. Before that time the kiosk shows a countdown and prints nothing. At the minute, scanning starts on its own.
On the kiosk: gear → Event → Scanning opens. Open gates now is on the same card. Line's early during a countdown: hold the gear → Start scanning this event now.
No time set? Scans as soon as the event is chosen.
4.4
Scanning
Scan mode, the operator gear, and a test print.
Fan holds the phone to the scanner below the screen. Bright white glow means ready. Band prints in about seven seconds.
- Phone 4–6 inches away, brightness up.
- Success shows name and pass type, then "tear off below."
- Errors show why and return to scan in five seconds.
- Test passes never count toward totals.
- Test print each printer before gates, after a jam, and after every roll change. Gear → Status → the printer → Test print.
- Screenshots of a pass work. Printed paper works. Glare on a screen protector doesn't.
4.5
Every scan result
Seven outcomes. Errors clear themselves in five seconds.
Green check, then the fan's name, photo, and pass type. Band slides out under the scanner.
Real pass, different date. Check the fan's phone. If the kiosk is wrong: gear → Change Event.
Real pass, different show at your track. Same fix.
Printed once already. Ask to see the band. Lost: gear → Event stats → fan's name → reprint.
Not one of ours. Ticket window.
Door open, empty spindle, or jam. Fix it and rescan.
Real pass, but its type has no printer assigned (Grandstand GA, say). Grandstand gate, or assign it: gear → Change Event → ticket types.
Practice these with the test passes.
4.6
Event stats
Gear → Event → View stats.
4.7
Operator settings
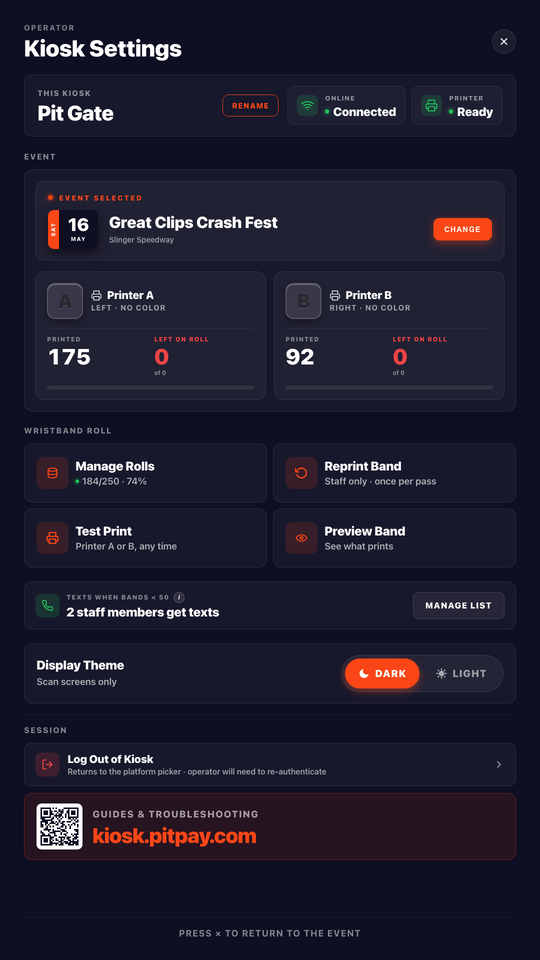
Hold the gear. Fans never see this.
Hold the gear bottom-left for a second. Fans see nothing. On the platform picker the same controls sit in the open, plus Connect to Wi-Fi.
- Connection and printer status
- Change Event, tonight's color, event stats
- Manage Rolls. Mid-event swap: open door, new roll band side up, close, tap Replace Roll. The other printer keeps printing meanwhile.
- Start scanning this event now, during a countdown
- Dark / light display
- Help & support QR
- Log out
4.8
Text alerts
Kiosk: Main Gate
Printer A is running low on wristbands, under 50 left. Have a fresh roll ready to swap in.
Kiosk: Main Gate
Printer A is out of wristbands. Load a fresh roll to resume printing.
Kiosk: Main Gate
PRN-03 Printer offline. Not taking scans.
You don't have to watch the rolls. Two texts, that's all.
Who gets them
- The phone that logged in to the kiosk.
- Every text names the event and the kiosk, so you know which gate.
4.9
When a kiosk can't run
Anything that stops scans puts up one screen: what broke, and Check in with event staff so the fan still gets into the pits. Nothing on that screen recovers the kiosk, and it never asks a fan to find another one — they come to you.
You get a text the moment it happens, with the same code the screen is showing. Read the code back when you call support.
What to do
- Put a person on the gate and check fans in manually so the line keeps moving.
- Open the door and look: roll loaded, printer light steady blue, cables seated.
- Still down? Hold the gear, then power the tablet down and back up.
- Nothing? Call support with the code on the screen.
The screen also shows how long the kiosk has been down, so you know whether it just happened or has been sitting there.
The five screens
Five fault screens · scroll →
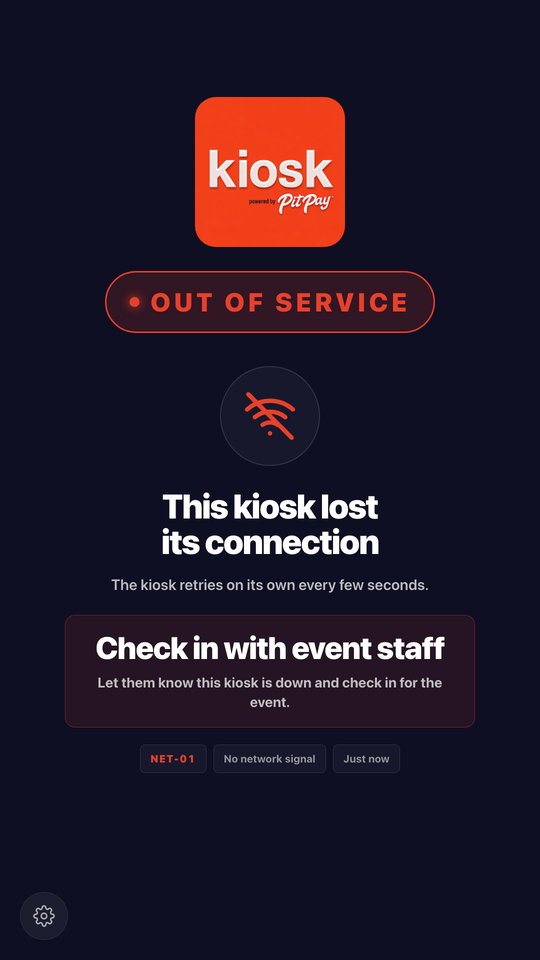
NET-01 · No network signal
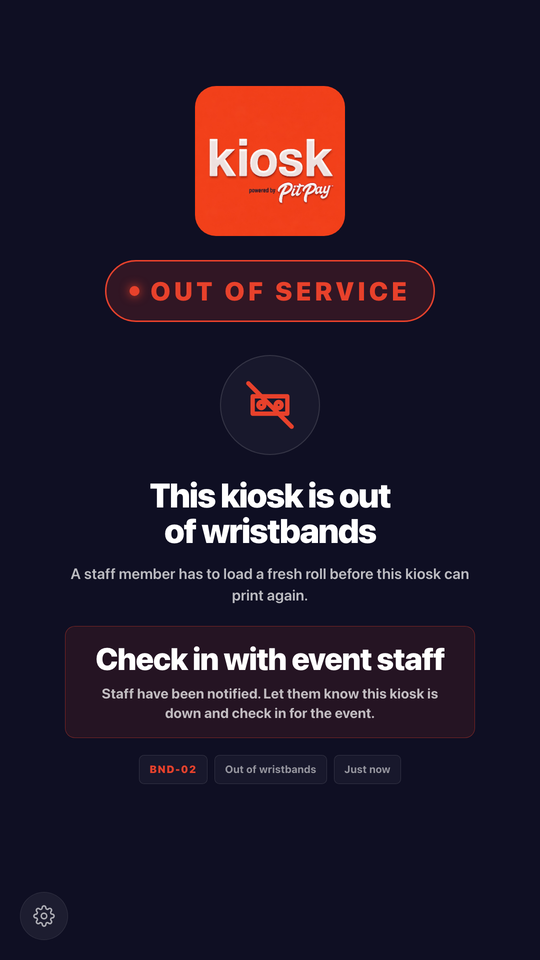
BND-02 · Out of wristbands
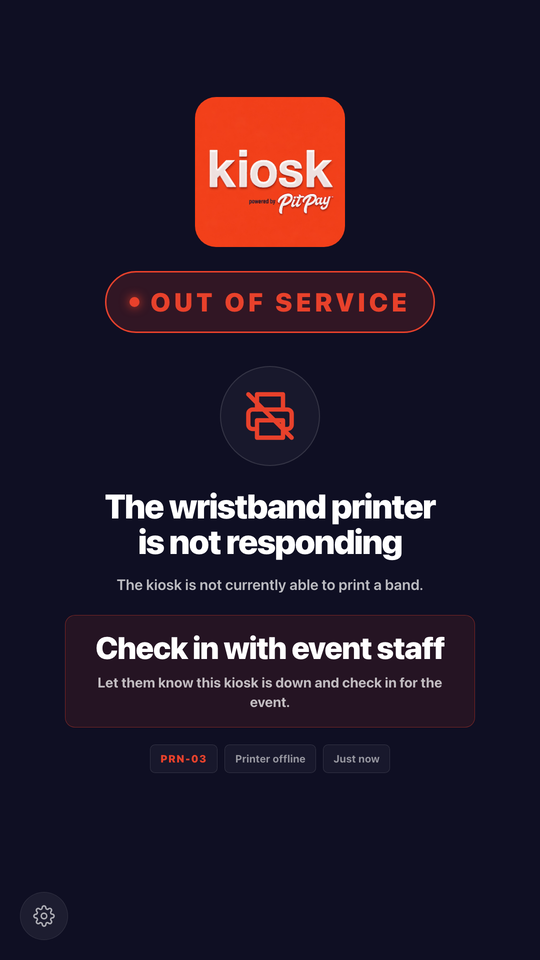
PRN-03 · Printer offline
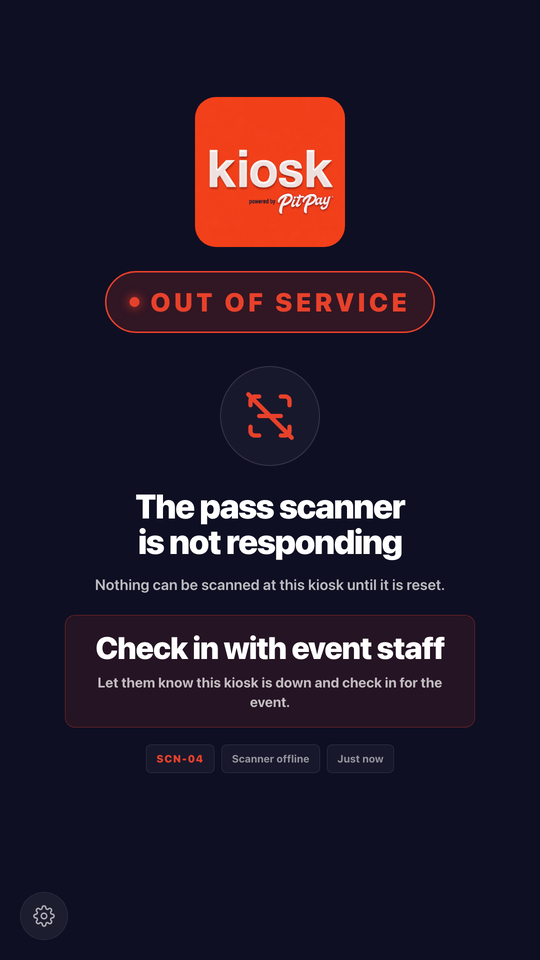
SCN-04 · Scanner offline
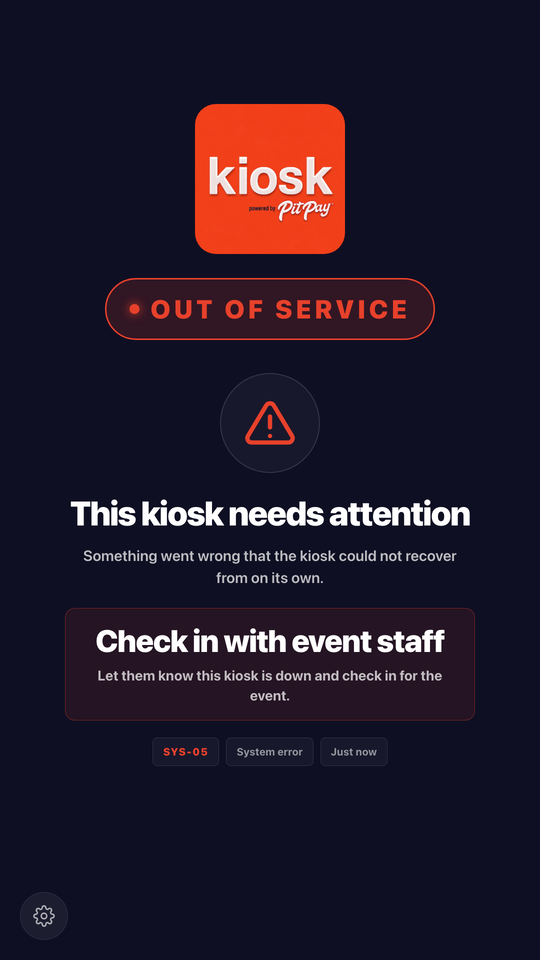
SYS-05 · System error
4.10
Closing out
Last scan, then shut the tablet down properly before you unplug.
- Wait for the printers to finish. Gear → Event stats: bands printed per printer, what's left on each roll.
- Pulling a partial roll? Tape it: color, date, bands left — see 5.3. It goes on Printer B next time and gets used up first.
- Gear → Log Out if someone else runs the next event.
- Swipe up from the bottom edge for the Android bar. Tap the power icon at the far right, past the volume buttons, confirm Power off.
- Wait for the scanner light to go out, then unplug at the wall. Don't pull the plug before that. Leave the rocker switch inside the door alone.
- Lock the door. Key back where it lives.
Next event: plug it in. It boots and opens Kiosk on its own. Tonight's numbers are in your dashboard under Reports → Kiosk, any past event, nothing to export.
5.1
Rolls & loading
Loading a roll, start to finish
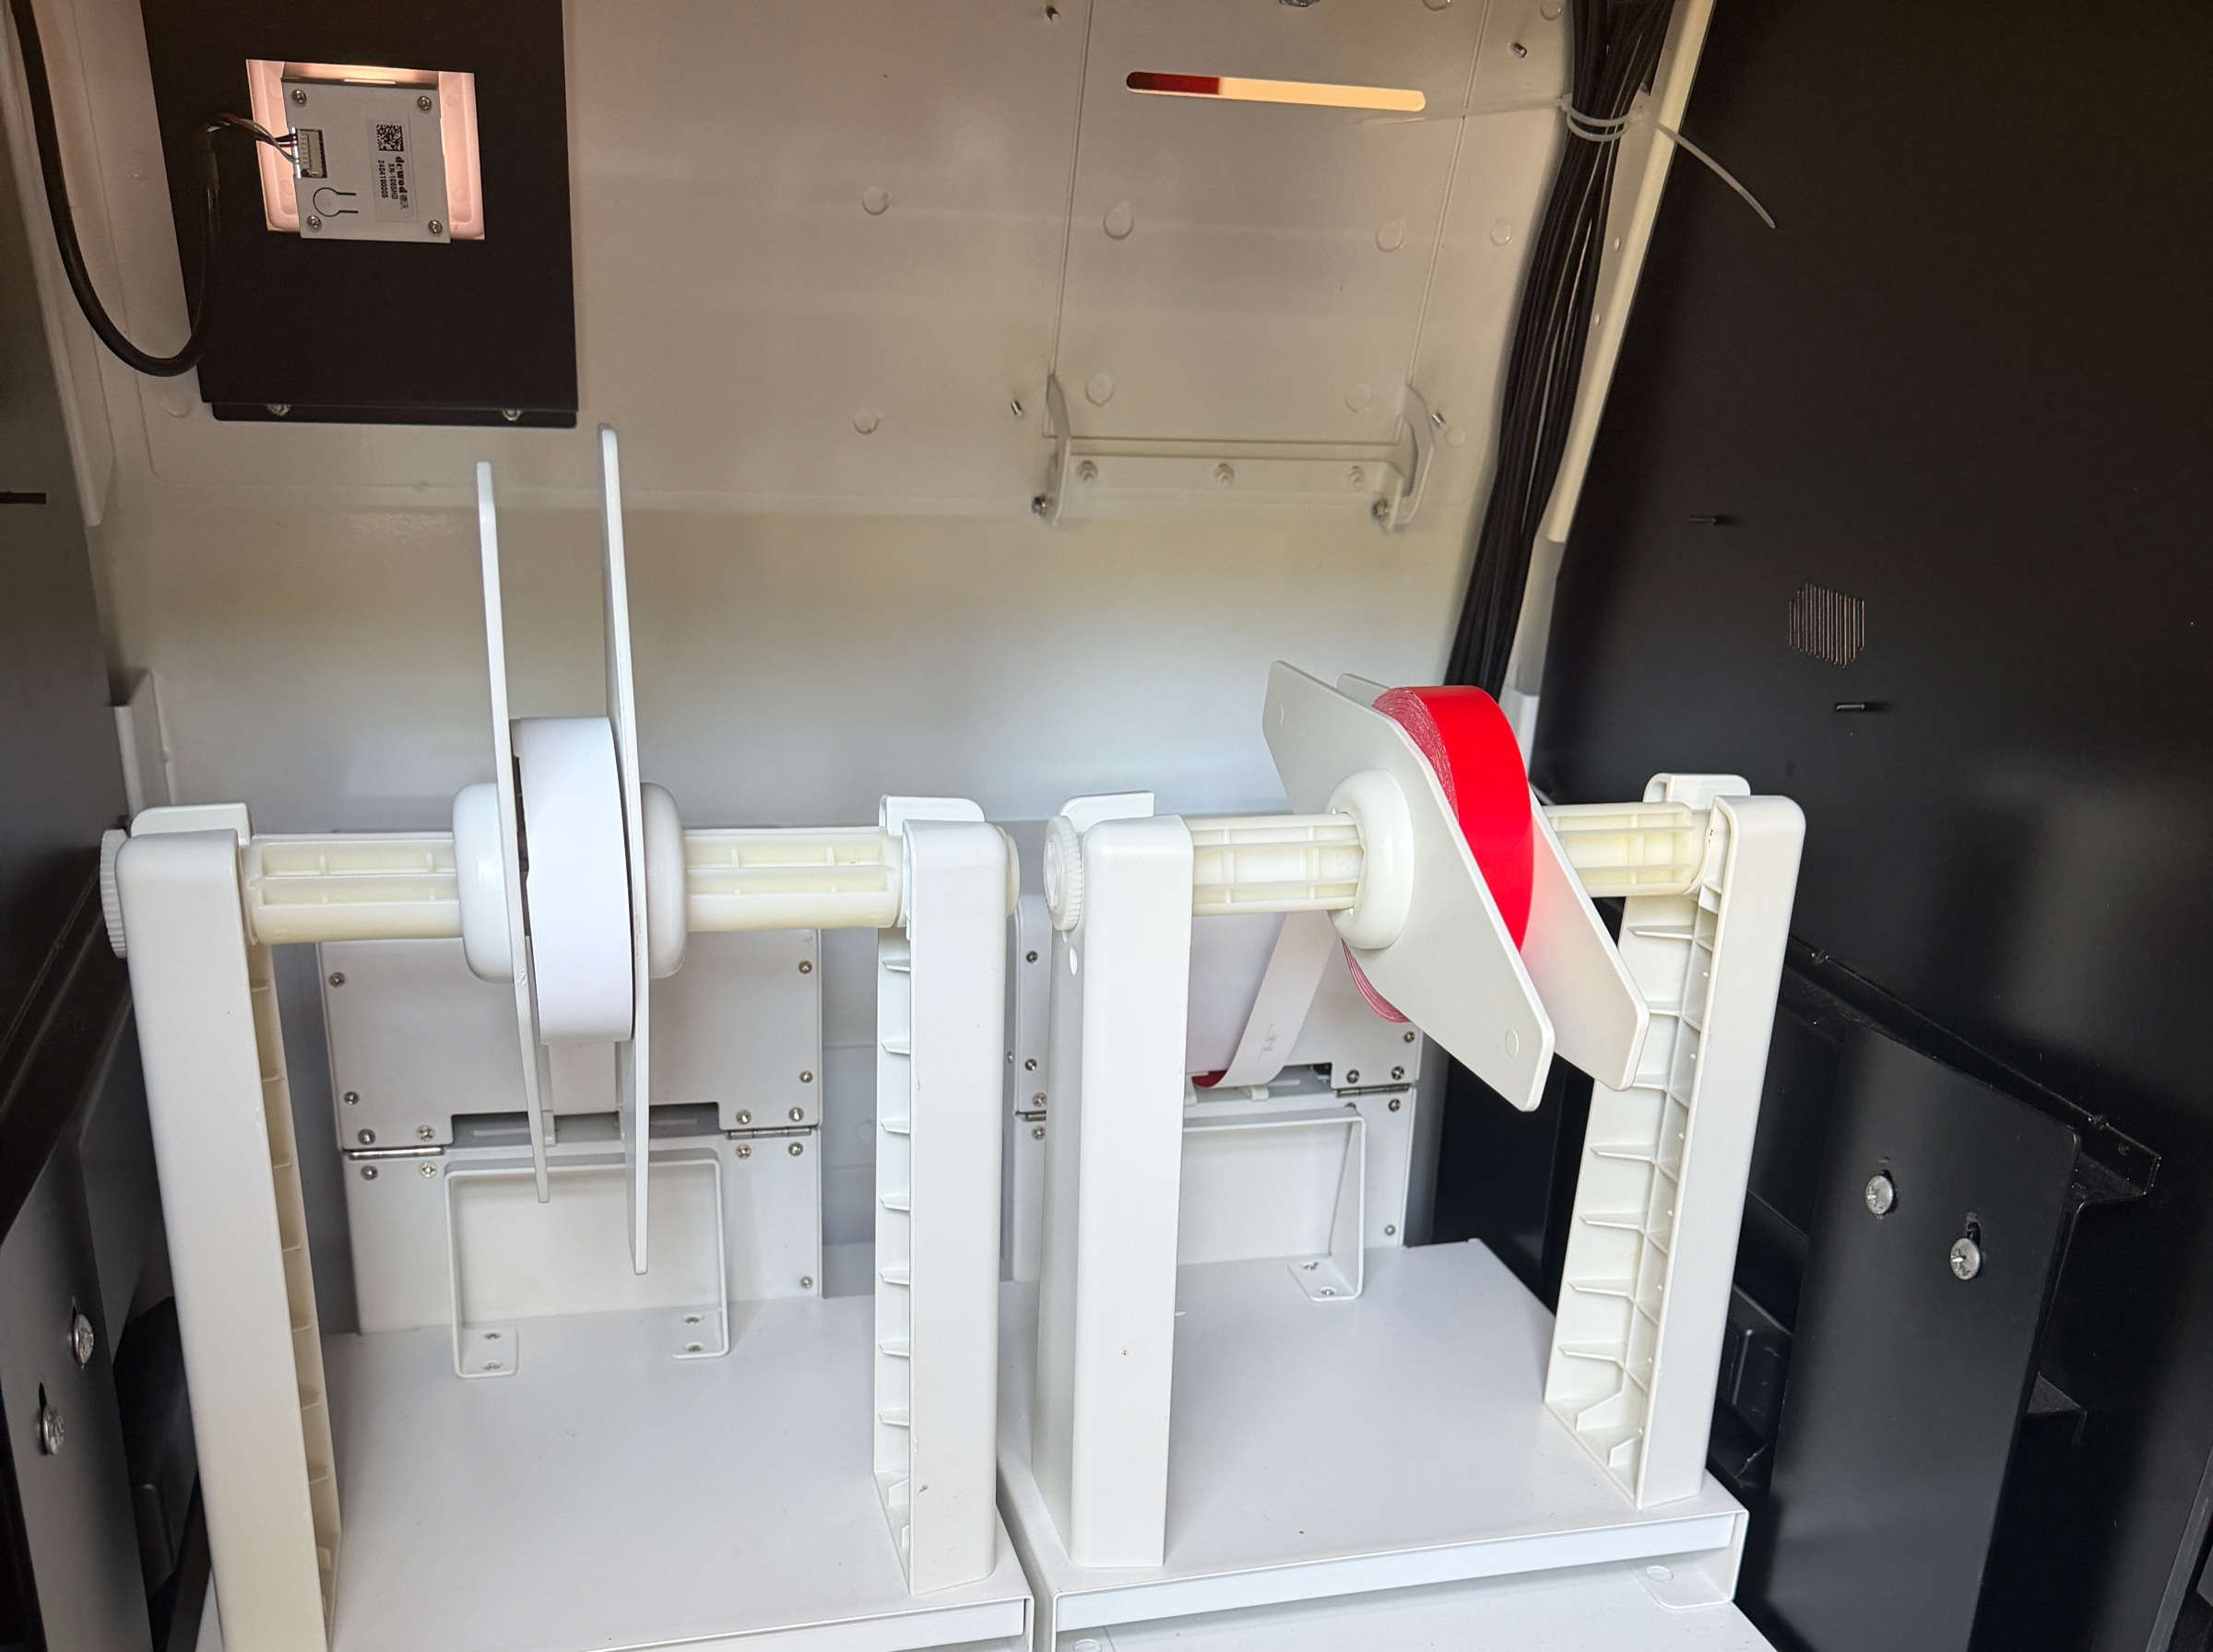
Loading a roll
- Open the door. Slide the guide disc off, drop the roll on the spindle so the band feeds off the front and down into the printer. Backwards prints blank.
- Feed the edge into the slot until the printer grabs it. Light goes steady blue.
- Slide the disc back snug. Close the door. Blinking blue means empty or jammed.
A and B
- Printer A is the primary, on the left facing the back. It does most of the work.
- Printer B is the backup, or the second color: kids' bands, day two of a weekend.
- Load full rolls on A, partials on B. B's partial gets used up instead of drifting around a drawer.
- Under 30 bands on a roll: don't load it. Hand those out at the ticket window.
- Tell the kiosk what's loaded: gear → Manage Rolls for colors and counts, then pick tonight's color when you choose the event.
5.2
Keeping count
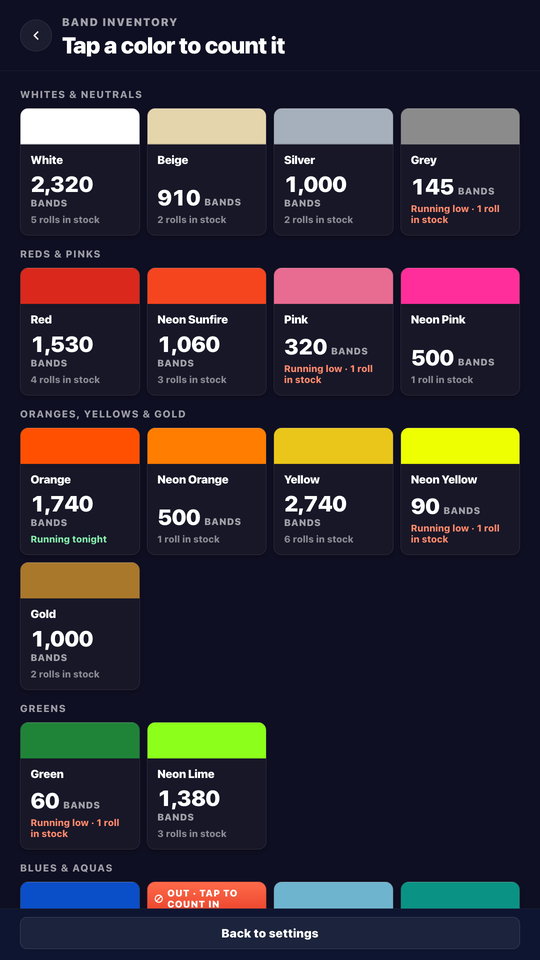
Gear → Manage Rolls
The kiosk counts every band it prints. It only knows how many were on the roll if you tell it.
Three habits
- Enter the real count when you load a roll. A new roll is 500. A partial is whatever the tape says.
- Replace rolls from the gear, not just by swapping them. Gear → Manage Rolls → the color → Replace roll. That closes out the old roll's count and starts the new one.
- Tape every roll you pull. Color, date, bands left, on blue painter's tape — the full routine is in 5.3.
What you get back
Gear → Event stats shows bands printed tonight on each printer and what's left on each roll. Your dashboard, under Reports → Kiosk, keeps every event: bands by color, by hour, and on-hand inventory per color across the season. Pick any past event to see what it ran.
If the counts are right, you never guess. You know how many red bands are in the building right now, and what last year's Nationals used before you order this year's.
5.3
Taping the roll
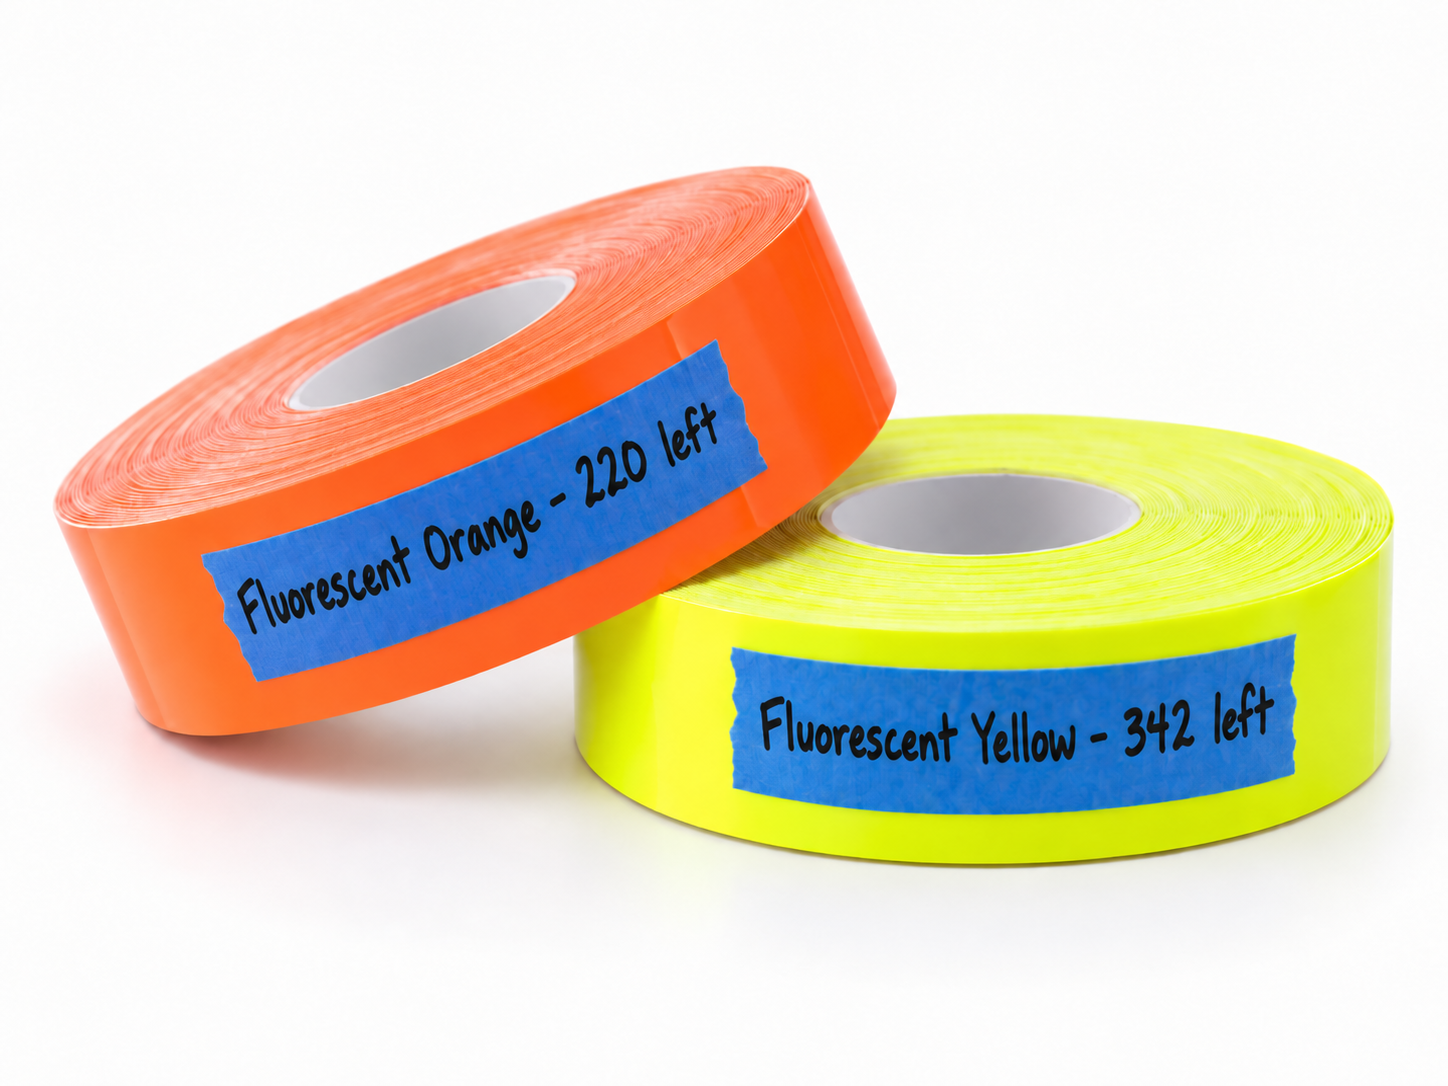
Color and count, on blue tape, facing out.
A partial roll with nothing written on it is a guess. Keep a roll of blue painter's masking tape and a marker inside the kiosk, and the count survives the trip back to the shelf.
End of the night
- Gear → Event stats. Read what's left on each roll.
- Pull the partial. Run a strip of blue painter's tape across the roll and write on it: color, date, bands left. Marker, not pen — pen won't take on the tape.
- Back in the box, tape facing out so you can read it without picking the roll up.
That number is what you type in when the roll goes back on a printer. Tape it the same way every time and your on-hand inventory stays true all season.
Doing it at the next event instead
Most tracks don't swap bands the night of. That's fine — the count keeps. Before you load anything the next event, open Reports → Kiosk, pick the last event, and read what was left on that roll. Tape it, then load it.
Tape it before you print. Once the kiosk starts printing on a roll you never counted, the number on the shelf and the number in the report drift apart, and there's no getting them back without counting bands by hand.
5.4
Ordering bands
Order in rolls of 500. Fill this out, hit Draft the email, and it opens your mail app with the whole order written up and addressed to support@pitpay.com. Nothing is sent until you press send.
We invoice you when the order comes in. Bands go on order once the invoice is paid, so plan on about 45 days start to finish. In a hurry? Say so in the notes — we can expedite by air freight, which carries an extra charge we'll quote before anything ships.
Your mail app opens with the order filled in. Send it and we'll invoice you.
5.5
Band colors
Twenty-one colors. Pick ones a guard can tell apart from twenty feet under stadium lights.
- Never reuse yesterday's color on a multi-day event.
- Light colors print the sharpest names and QR codes.
- Full color reference →
5.6
Custom wristbands
Send us your logo. It prints on the band with the fan's name and pass type. No setup fee, any of the 21 colors.
- Black-and-white vector (SVG, EPS, or high-res PNG) to support@pitpay.com. One color, no gradients, no fine text.
- Different logo per event? Say which event.
- Sponsor logos work the same way.
6.1
Troubleshooting
Four parts. Check in this order.
Switch not lit: reseat the cord at both ends, then the breaker. Lit but black screen: unplug 10 seconds, plug back in.
Blank bands: roll is backwards. Not printing: door open or roll not seated. Blinking: empty. Jammed: pull the band straight out, re-feed.
Not responding: wipe it, unplug 10 seconds, plug back in. Dimmed in the sun: overheating. Shade it, cool ten minutes.
Wipe the glass. Phone 4–6 inches, brightness up. White light means ready. No light: restart. Still not sure? Run the scanner test below.
Scanner test
Hold your phone up to the eye with one of these passes on screen. Each one should give the result it's labeled with. If none of them read, the eye is the problem, not the passes: wipe it, kill the glare, restart. Still nothing? Text us.
Seven passes · scroll →
(ADULT PIT PASS)

What the kiosk shows
(CREW PASS)
What the kiosk shows
(GENERAL ADMISSION)
What the kiosk shows
(ADULT PIT PASS)
What the kiosk shows
(VOID)
What the kiosk shows
(VIP SUITE)
What the kiosk shows
(ADULT PIT PASS)
What the kiosk shows
Lost connection
Out of Service screen, retries on its own. Check the antenna, then the router. Router fine: restart the kiosk. See 3.1.
6.2
Support
Text 855-748-1290 during event hours, or email support@pitpay.com.
Send photos, not descriptions
- The kiosk screen showing the error.
- Inside the door: power light, printer lights, rolls.
- Kiosk name and track name.
- One sentence: what happened right before.
- Fan's pass? A screenshot of it.